

Centralized configuration storages
Enterprise Edition
Centralized configuration storages are supported by the Enterprise Edition only.
Examples on GitHub: centralized_config
Tarantool enables you to store a cluster’s configuration in one reliable place using a Tarantool or etcd-based storage:
- A Tarantool-based configuration storage is a replica set that stores a cluster’s configuration in synchronous spaces.
- etcd is a distributed key-value storage for any type of critical data used by distributed systems.
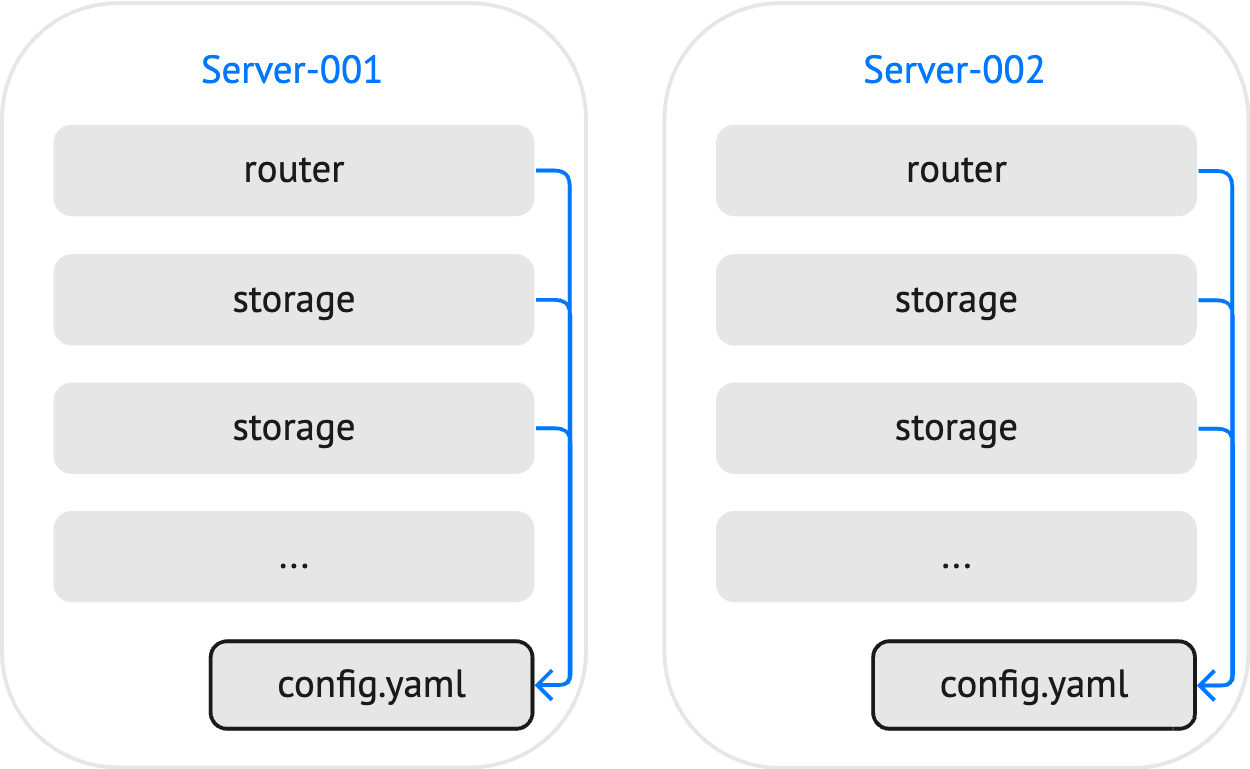
With a local YAML configuration, you need to make sure that all cluster instances use identical configuration files:
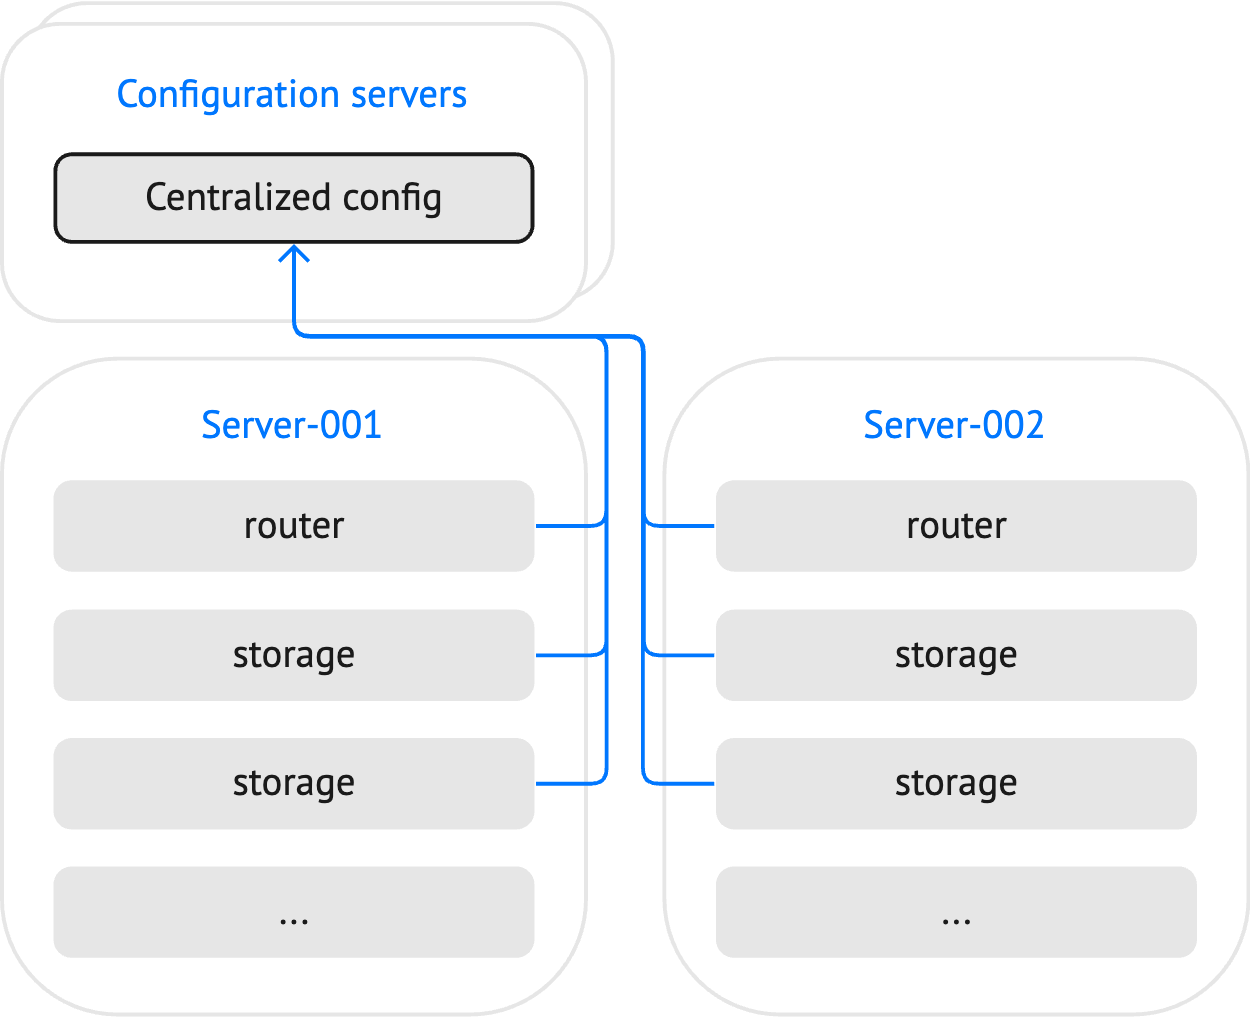
Using a centralized configuration storage, all instances get the actual configuration from one place:
This topic describes how to set up a configuration storage, publish a cluster configuration to this storage, and use this configuration for all cluster instances.
To make a replica set act as a configuration storage, use the built-in config.storage role.
To configure a Tarantool-based storage, follow the steps below:
Define a replica set topology and specify the following options at the replica set level:
- Enable the
config.storagerole in roles. - Optionally, provide the role configuration in roles_cfg. In the example below, the
status_check_intervaloption sets the interval (in seconds) of status checks.
groups:
  group001:
    replicasets:
      replicaset001:
        roles: [ config.storage ]
        roles_cfg:
          config.storage:
            status_check_interval: 3
        instances:
          instance001:
            iproto:
              listen:
              - uri: '127.0.0.1:4401'
          instance002:
            iproto:
              listen:
              - uri: '127.0.0.1:4402'
          instance003:
            iproto:
              listen:
              - uri: '127.0.0.1:4403'
- Enable the
Create a user and grant them the following privileges:
- The
readandwritepermissions to theconfig_storageandconfig_storage_metaspaces used to store configuration data. - The
executepermission touniverseto allow interacting with the storage using the tt utility.
credentials:
  users:
    sampleuser:
      password: '123456'
      privileges:
      - permissions: [ read, write ]
        spaces: [ config_storage, config_storage_meta ]
      - permissions: [ execute ]
        universe: true
- The
Set the replication.failover option to
electionto enable automated failover:replication: failover: election
Enable the MVCC transaction mode to provide linearizability of read operations:
database: use_mvcc_engine: true
The resulting storage configuration might look as follows:
credentials:
users:
sampleuser:
password: '123456'
privileges:
- permissions: [ read, write ]
spaces: [ config_storage, config_storage_meta ]
- permissions: [ execute ]
universe: true
replicator:
password: 'topsecret'
roles: [ replication ]
iproto:
advertise:
peer:
login: replicator
replication:
  failover: election
database:
  use_mvcc_engine: true
groups:
group001:
replicasets:
replicaset001:
roles: [ config.storage ]
roles_cfg:
config.storage:
status_check_interval: 3
instances:
instance001:
iproto:
listen:
- uri: '127.0.0.1:4401'
instance002:
iproto:
listen:
- uri: '127.0.0.1:4402'
instance003:
iproto:
listen:
- uri: '127.0.0.1:4403'
You can find the full example here: tarantool_config_storage.
To start instances of the configured storage, use the tt start command, for example:
$ tt start tarantool_config_storage
Learn more from the Starting and stopping instances section.
To learn how to set up an etcd-based configuration storage, consult the etcd documentation.
The example script below demonstrates how to use the etcdctl utility to create a user that has read and write access to configurations stored by the /myapp/ prefix:
etcdctl user add root:topsecret
etcdctl role add myapp_config_manager
etcdctl role grant-permission myapp_config_manager --prefix=true readwrite /myapp/
etcdctl user add sampleuser:123456
etcdctl user grant-role sampleuser myapp_config_manager
etcdctl auth enable
The credentials of this user should be specified when configuring a connection to the etcd cluster.
The tt utility provides the tt cluster command for managing centralized cluster configurations.
The tt cluster publish command can be used to publish a cluster’s configuration to both Tarantool and etcd-based storages.
The example below shows how a tt environment and a layout of the application called myapp might look:
├── tt.yaml
├── source.yaml
└── instances.enabled
    └── myapp
        ├── config.yaml
        └── instances.yml
tt.yaml: a tt configuration file.source.yamlcontains a cluster’s configuration to be published.config.yamlcontains a local configuration used to connect to the centralized storage.instances.ymlspecifies instances to run in the current environment. The configured instances are used by tt when starting a cluster.tt cluster publishignores this configuration file.
To publish a cluster’s configuration (source.yaml) to a centralized storage, execute tt cluster publish as follows:
$ tt cluster publish "http://sampleuser:123456@localhost:2379/myapp" source.yaml
Executing this command publishes a cluster configuration by the /myapp/config/all path.
Примечание
You can see a cluster’s configuration using the tt cluster show command.
The config module provides the API for interacting with a Tarantool-based configuration storage.
The example below shows how to read a configuration stored in the source.yaml file using the fio module API and put this configuration by the /myapp/config/all path:
local fio = require('fio')
local cluster_config_handle = fio.open('../../source.yaml')
local cluster_config = cluster_config_handle:read()
local response = config.storage.put('/myapp/config/all', cluster_config)
cluster_config_handle:close()
Learn more from the config.storage API section.
Примечание
The net.box module provides the ability to monitor configuration updates by watching path or prefix changes. Learn more in conn:watch().
To use a configuration from a centralized storage for your cluster, you need to provide connection settings in a local configuration file.
Connection options for a Tarantool-based storage should be specified in the config.storage section of the configuration file. In the example below, the following options are specified:
config:
  storage:
    endpoints:
      - uri: '127.0.0.1:4401'
        login: sampleuser
        password: '123456'
      - uri: '127.0.0.1:4402'
        login: sampleuser
        password: '123456'
      - uri: '127.0.0.1:4403'
        login: sampleuser
        password: '123456'
    prefix: /myapp
    timeout: 3
    reconnect_after: 5
endpointsspecifies the list of configuration storage endpoints.prefixsets a key prefix used to search a configuration. Tarantool searches keys by the following path:<prefix>/config/*. Note that<prefix>should start with a slash (/).timeoutspecifies the interval (in seconds) to perform the status check of a configuration storage.reconnect_afterspecifies how much time to wait (in seconds) before reconnecting to a configuration storage.
You can find the full example here: config_storage.
Connection options for etcd should be specified in the config.etcd section of the configuration file. In the example below, the following options are specified:
config:
  etcd:
    endpoints:
    - http://localhost:2379
    prefix: /myapp
    username: sampleuser
    password: '123456'
    http:
      request:
        timeout: 3
endpointsspecifies the list of etcd endpoints.prefixsets a key prefix used to search a configuration. Tarantool searches keys by the following path:<prefix>/config/*. Note that<prefix>should start with a slash (/).usernameandpasswordspecify credentials used for authentication.http.request.timeoutconfigures a request timeout for an etcd server.
You can find the full example here: config_etcd.
The tt utility is the recommended way to start Tarantool instances. You can learn how to do this from the Starting and stopping instances section.
You can also use the tarantool command to start a Tarantool instance.
In this case, you can eliminate creating a local configuration and provide connection settings using the following environment variables:
- Tarantool-based storage:
TT_CONFIG_STORAGE_ENDPOINTSandTT_CONFIG_STORAGE_PREFIX. - etcd-based storage:
TT_CONFIG_ETCD_ENDPOINTSandTT_CONFIG_ETCD_PREFIX.
The example below shows how to provide etcd connection settings and start cluster instances using the tarantool command:
$ export TT_CONFIG_ETCD_ENDPOINTS=http://localhost:2379
$ export TT_CONFIG_ETCD_PREFIX=/myapp

$ tarantool --name instance001
$ tarantool --name instance002
$ tarantool --name instance003
By default, Tarantool watches keys with the specified prefix for changes in a cluster’s configuration and reloads a changed configuration automatically.
If necessary, you can set the config.reload option to manual to turn off configuration reloading:
config:
  reload: 'manual'
  etcd:
    # ...
In this case, you can reload a configuration in an admin console or application code using the reload() function provided by the config module:
require('config'):reload()